# Automated Material System

# Introduction to AMS

## **How does AMS work?**

The AMS consists of three major parts: a set of four **Filament Slots**, a **Filaments Hub**, and a **Filament Buffer**. Each **Filament Slot** has its own motor to actively push the filament forward or rewind it to the spool. The **Filament Hub** merges four filament paths into one and gives the filament a second-stage driving force with a brushless motor. The **Filament Buffer** is located at the back of the printer, which connects the AMS to the tool head extruder, in order to ensure the tension on the filament is within a given range so that the tool head extruder can work easily and precisely.   
  
In total, there are 10 sensors integrated into the filament path, meticulously monitoring and controlling the position, speed, and tension of the filament.

<figure class="table" id="bkmrk-"><table><tbody><tr><td><figure class="image image_resized">![](https://wiki.bambulab.com/x1/manual/intro-ams/ams-photo.jpg)</figure></td><td><figure class="image">![](https://wiki.bambulab.com/x1/manual/intro-ams/ams-lid-size1.png)</figure></td></tr></tbody></table>

</figure>## **Internal Components**

### **Filament Slot** 

The AMS has 4 filament slots, each filament slot has its own motor and gears to actively push the filament forward or wind it back to the spool. Each filament slot also has a sensor to detect the filament, when a filament is inserted, it will pull the filament automatically. During this process, it pulls the filament just like an extruder. When it needs to wind the filament back, it also rotates the spool for filament winding.

<figure class="image" id="bkmrk--1">![](https://wiki.bambulab.com/x1/manual/intro-ams/filament-slots.jpg)</figure>### **Filaments Hub** 

The **Filaments Hub** is located at the bottom of AMS, it consists of four hall sensors, one magnetic rotary encoder, and one brushless motor. It merges four filament paths into one. The hall sensor detects when the filament has reached a specific location, which in turn activates the brushless motor to give the filament a second stage driving force.

<figure class="image" id="bkmrk--2">![](https://wiki.bambulab.com/x1/manual/intro-ams/filament-hub.jpg)</figure>#### **RFID system**

The **RFID System** can automatically identify the RFID tag on the Bambulab filament spools, which can then sync the filament information to the Bambulab slicer (Bambu Studio).

<figure class="image image_resized" id="bkmrk--3">![](https://wiki.bambulab.com/x1/manual/intro-ams/rfid-antenna.png)</figure>#### **Moisture-proof System** 

The **Moisture-proof System** consists of a humidity sensor, two packets of desiccant, and silicon rubber O-rings. The desiccant can absorb moisture to keep the air in the AMS dry. The silicon rubber O-rings are installed to make sure the AMS remains airtight in order to avoid ruining your hygroscopic filaments. When the air humidity exceeds the standard preset in the AMS, the humidity sensor \[under development\] will detect and remind the user to replace the desiccant bags.

<figure class="image image_resized" id="bkmrk--4">![](https://wiki.bambulab.com/x1/manual/intro-ams/moisture-proof-system.jpg)</figure>## External Components

The AMS needs to either be paired with a filament buffer (single AMS) or an AMS Hub (Multiple AMS)

### **Filament Buffer** 

<figure class="image image_resized" id="bkmrk--5">![](https://wiki.bambulab.com/x1/manual/intro-ams/filament-buffer.png)</figure>The Filament Buffer is located at the back of the printer, connected to both the AMS and the toolhead extruder. It has a slide, a spring, and a hall sensor. When the AMS pushes the filament into the toolhead extruder, the slide will move forward due to the pressure of the filament. The hall sensor can then detect the displacement and location of the slide, and feedback that signal back to the AMS and the printer. By controlling the feed speed of the AMS, we can make sure the tension on the filament is within a given range so that the toolhead extruder can work easily and precisely, without adding too much or too little tension.

### **AMS Hub** 

<figure class="image image_resized" id="bkmrk--6">![](https://wiki.bambulab.com/x1/manual/intro-ams/ams-hub.png)</figure>The **AMS Hub** replaces the filament Buffer. It allows the user to connect four AMS units, which in turn can supply 16 different filament spools to the printer. The AMS Hub is composed of a filament selection module and a buffer module. The filament selection module has four inlets to connect to four separate AMS units. Each slot has a hall sensor to detect the filament. The buffer module’s function is the same as it is with the standard filament buffer, it has a slide, a spring, and a hall sensor to make sure the tension on the filaments is within a given range.

<p class="callout warning">The AMS only supports spools with a width of 50-68mm and a diameter of 197-202mm.</p>

<p class="callout danger">It is recommended to not use cardboard spools without plastic adapter rings as they can slip and as the cardboard wears the scarf can clog the workings of the AMS</p>

<p class="callout danger">Do not load soft materials like TPU (excluding TPU for AMS) and damp PVA into the AMS, as the functioning of the AMS can cause these to break within the AMS and Filament Buffer or AMS Hub.</p>

# Introduction to AMS2 Pro


# New Page


# New Page


# Optional Accessories

### PTFE adapter

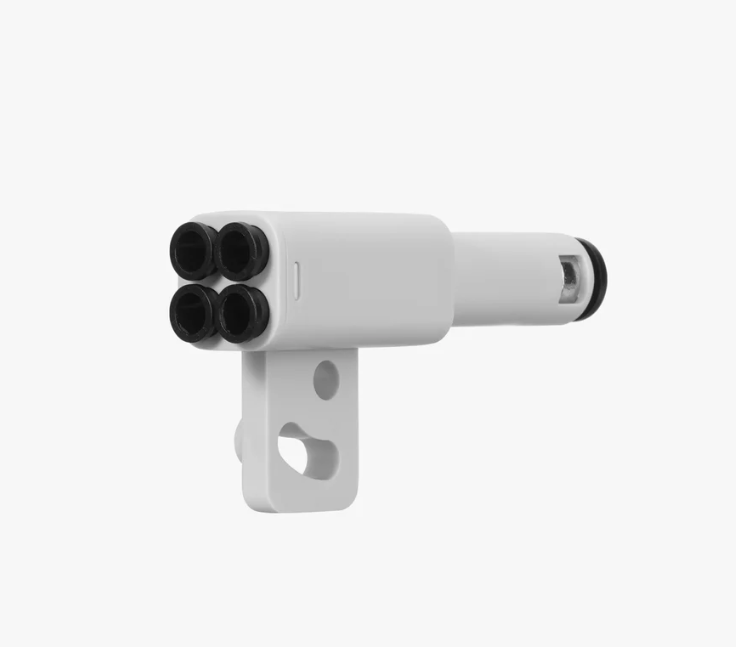
PTFE tube can connect 4 feed tubes to the printer at the same time. When connecting multiple AMS 2 Pro to H2 series printers, the PTFE adapter is required.
![](https://wiki.bambulab.com/ams-2-pro/manual/part-intro-and-connection-guide/en/image-17.png)

# Introduction to HMS2 HT


# Connecting AMS to the Printer

## Single AMS Setup

<table border="1" id="bkmrk-ake-the-ptfe-tube-fr"><colgroup><col></col><col></col></colgroup><tbody><tr><td>Take the PTFE tube from inside the AMS unit, and connect it from the blue PTFE coupler on the machine to the filament buffer in the back.

</td><td><figure contenteditable="false">![](https://wiki.bambulab.com/x1/manual/connect-ams/step-1-connect-ptfe-blue-coupler-to-filament-buffer.png)</figure><figure contenteditable="false">![](https://wiki.bambulab.com/x1/manual/connect-ams/check_buffer_spring.png)<figcaption contenteditable="true"><p class="callout warning">Make sure the spring of the buffer is not stuck</p>

</figcaption></figure></td></tr><tr><td>Take the PTFE tube which is already connected to the AMS unit, and connect it to the left side of the filament buffer.

</td><td><figure contenteditable="false">![](https://wiki.bambulab.com/x1/manual/connect-ams/step-2-ptfe-from-ams-to-left-filament-buffer.png)</figure></td></tr><tr><td>Connect the four-pin cable to the connector located at the bottom of the filament buffer, then proceed to connect it to the printer as shown below.

</td><td><figure contenteditable="false">![](https://wiki.bambulab.com/x1/manual/connect-ams/step-3-connect-fourpin-under-filament-buffer-into-port.png)</figure><p class="callout danger">Note: Do not insert the 4-pin cable in the wrong direction. If you are using an L-shaped plug cable, pay attention to the text prompts on it. If you insert the 4-pin cable in the wrong direction, it may cause the printer and AMS mainboard to burn down.</p>

<figure contenteditable="false">![](https://wiki.bambulab.com/x1/manual/connect-ams-hub/4p_dir.png)</figure>[![image.png](https://docs.home.schwetz.au/uploads/images/gallery/2025-05/scaled-1680-/vQ3Lwiok8evTqi5y-image.png)](https://docs.home.schwetz.au/uploads/images/gallery/2025-05/vQ3Lwiok8evTqi5y-image.png)

</td></tr><tr><td>  
</td><td><figure contenteditable="false">![](https://wiki.bambulab.com/x1/manual/connect-ams/step-4-connect-to-first-port-on-ams.png)</figure></td></tr><tr><td>Connect the six-pin cable to the first connector on the AMS, and the other side needs to be connected to the connector located on the left side of the filament buffer.

</td><td>[![image.png](https://docs.home.schwetz.au/uploads/images/gallery/2025-05/scaled-1680-/gx8YTf6ufkYbbJz6-image.png)](https://docs.home.schwetz.au/uploads/images/gallery/2025-05/gx8YTf6ufkYbbJz6-image.png)

[![image.png](https://docs.home.schwetz.au/uploads/images/gallery/2025-05/scaled-1680-/BHjvkDBi6mVdoPdM-image.png)](https://docs.home.schwetz.au/uploads/images/gallery/2025-05/BHjvkDBi6mVdoPdM-image.png)

<figure contenteditable="false">![](https://wiki.bambulab.com/x1/manual/connect-ams/step-4-connect-to-leftside-of-filament-buffer.png)</figure>[![image.png](https://docs.home.schwetz.au/uploads/images/gallery/2025-05/scaled-1680-/eyhdbqDiLnhnNNlv-image.png)](https://docs.home.schwetz.au/uploads/images/gallery/2025-05/eyhdbqDiLnhnNNlv-image.png)

<p class="callout warning">If the spool holder is installed, place the PTEF tube under the holder to reduce resistance of loading/unloading</p>

</td></tr></tbody></table>

## Multi AMS Setup

### Filament Buffer and AMS Hub

The built-in Filament Buffer of the printer can only be connected to 1 AMS. When replaced with AMS Hub, the printer will be able to connect up to 4 AMS.

<figure class="image image_resized" id="bkmrk-">![](https://wiki.bambulab.com/ams/ams-hub/buffer_hub.jpg)</figure>### Connect AMS Hub and multi-AMS

<table border="1" id="bkmrk-please-remove-the-bu" style="border-collapse: collapse; width: 100%;"><colgroup><col style="width: 35.238095%;"></col><col style="width: 64.642857%;"></col></colgroup><tbody><tr><td>Please remove the buffer from the back of the printer (if applicable) and install the AMS Hub, as shown in the image below. Once the AMS Hub has been installed, proceed to connect the PTFE tube from the Hub to the PTFE coupler.</td><td><figure class="image image_resized">![](https://wiki.bambulab.com/x1/manual/connect-ams-hub/ptfe_couple.jpg)</figure></td></tr><tr><td>Please ensure that the PTFE tube runs under the spool holder and not over, as shown in the image below. </td><td><figure class="image image_resized">![](https://wiki.bambulab.com/x1/manual/connect-ams-hub/avoid_ptfe_from_touching_spool_holder.png.jpg)</figure><p class="callout warning">Please ensure that the PTFE tube runs **under** the spool holder and not over, as shown in the image below. </p>

<figure class="image image_resized">![](https://wiki.bambulab.com/x1/manual/connect-ams-hub/check_if_spring_stuck.png.jpg)</figure><p class="callout warning">The spring within the AMS Hub should not be stuck/compressed. Please ensure that it moves freely within the AMS Hub.</p>

</td></tr><tr><td>Connect the AMS Hub to the printer with the Bambu Bus Cable 4 pin.</td><td><figure class="image image_resized">![](https://wiki.bambulab.com/x1/manual/connect-ams-hub/4p_dir.png)<figcaption><p class="callout danger">When connecting the 4 pin cable, make sure it is in the correct orientation. If you are using an L-shaped plug cable, pay attention to its text prompts. If you insert the 4 pin cable in the wrong direction, it may cause the printer and AMS mainboard to burn down</p>

<figure class="image image_resized">![](https://wiki.bambulab.com/x1/manual/connect-ams-hub/l%E5%9E%8B%E6%8F%92%E5%A4%B4.png)<figcaption></figcaption></figure></figcaption></figure></td></tr><tr><td>Connect AMS to the AMS hub

</td><td><figure class="image image_resized">![](https://wiki.bambulab.com/x1/manual/connect-ams-hub/cable_connect_and_id.png)</figure></td></tr><tr><td>Connect the most frequently used AMS to the AMS Hub and power on the printer. Then, connect the remaining AMS to the other Bus Cable 6 pin port of the previous AMS.

Kind reminder:   
Our store offers two types of 6-pin bus cables: 510 mm and 1500 mm in length. The 510 mm cable is commonly used for connecting the buffer and AMS, while the 1500 mm cable is widely used for connecting the AMS Hub and AMS.

</td><td><figure class="image image_resized">![](https://wiki.bambulab.com/x1/manual/connect-ams-hub/multi_ams_and_hub_connect.jpg)</figure><p class="callout info">Having the correct PTFE Tube length is important. We recommend keeping it as short as possible while avoiding excessive bending. This helps minimize AMS feed resistance and reduces the time required for filament loading and unloading.</p>

<p class="callout danger">Note: When connecting multiple AMS to the AMS Hub, it is advised to keep the longest PTFE tube length within 3.5 meters. Excessive length in the feeding path can result in increased resistance, potentially affecting the smooth loading and unloading of filament. Additionally, avoid excessive bending of the PTFE tube to minimize resistance.</p>

</td></tr><tr><td>Please check your printer to ensure the correct installation of the AMS Hub and additional AMS units. Refer to the provided image for a successful setup.</td><td><figure class="image image_resized">![](https://wiki.bambulab.com/x1/manual/connect-ams-hub/check_the_connection.jpg)</figure></td></tr></tbody></table>

### AMS ID assignment

Each AMS is assigned an ID, which is displayed on the screen. The logic for assigning AMS ID is to easily identify the connection between them, e.g., AMS1 is directly connected to the AMS Hub, AMS2 is connected to AMS1, and so on.

**Please note that you should connect them individually to be able to assign the ID in order. <u>Keep the printer powered on during this process.</u>**  
  
**However, if you connect multiple AMS units in advance and then connect to the AMS Hub at the end, or you connect all AMS to the hub before powering on the printer, it will randomly assign IDs to these AMS.**

<table border="1" id="bkmrk-ams-1-connects-to-th" style="border-collapse: collapse; width: 100%;"><colgroup><col style="width: 50%;"></col><col style="width: 50%;"></col></colgroup><tbody><tr><td>  
</td><td><figure class="image">![](https://wiki.bambulab.com/x1/manual/connect-ams-hub/assign_ams_id.png)<figcaption>AMS 1 connects to the AMS Hub, and then AMS 2 connects to AMS 1</figcaption></figure></td></tr><tr><td>  
</td><td><figure class="image image_resized">![](https://wiki.bambulab.com/x1/manual/connect-ams-hub/ams_id.png)</figure></td></tr></tbody></table>

## How to Reassign the AMS ID

The AMS ID will be saved and not cleared even if the machine is turned off. You can reset the AMS ID as shown below, **please disconnect the AMS cable after clicking this button**.

<figure class="image image_resized" id="bkmrk--1">![](https://wiki.bambulab.com/x1/manual/release-note/u3/%E9%87%8D%E7%BD%AEams_id_en.png)</figure><figure class="image image_resized" id="bkmrk--2"><figcaption></figcaption></figure>