
Using the LCD
This guide has been written using An X1 Carbon running firmware version 01.09.00.00 (20250429). If this firmware does not match yours
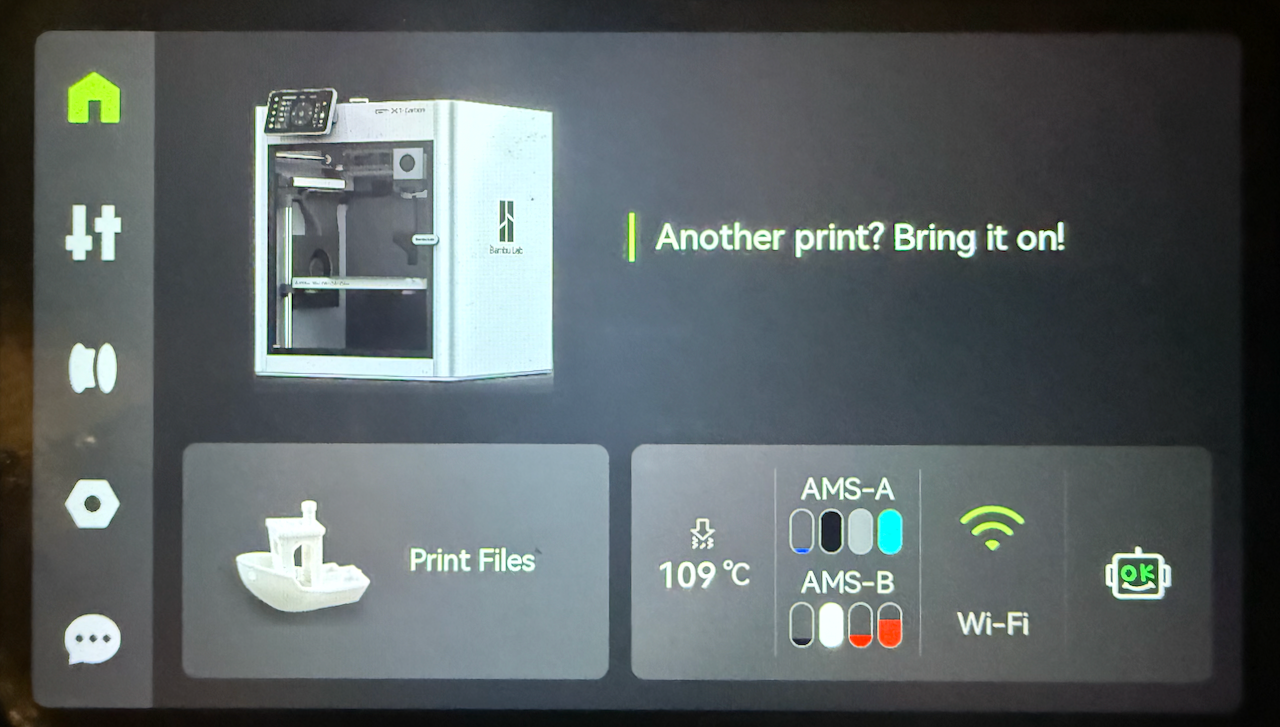
Home Screen
There are two types of home screen that are shown, depending on if vour printer is currently idle or creating a print. Below is an example of an idle print screen On the left side of the homescreen is the menu that includes options for:
- Homepage
- Controls
- Filaments
- Settings
- HMS Messages
- Print Files (from internal storage or SD-Card)
- Nozzle Temperature
- AMS Controls
- Wireless and
- Print Assistant
The second home screen that is shown is when what the printer shows whilst the a print is occurring, these options are:
- Homepage
- Controls
- Filaments
- Settings
- HMS Messages
- An thumbnail image and name of the currently printing file
- If a recording (timelapse) and/or video recording is occuring
- display of the current temperatures set on the device
- The percentage of the print completed along with the number of completed layers and total layers, along with the current time remaining
- Current printer status description
- Object Skip
- Object Pause
- Stop Print and
- Print Assistant

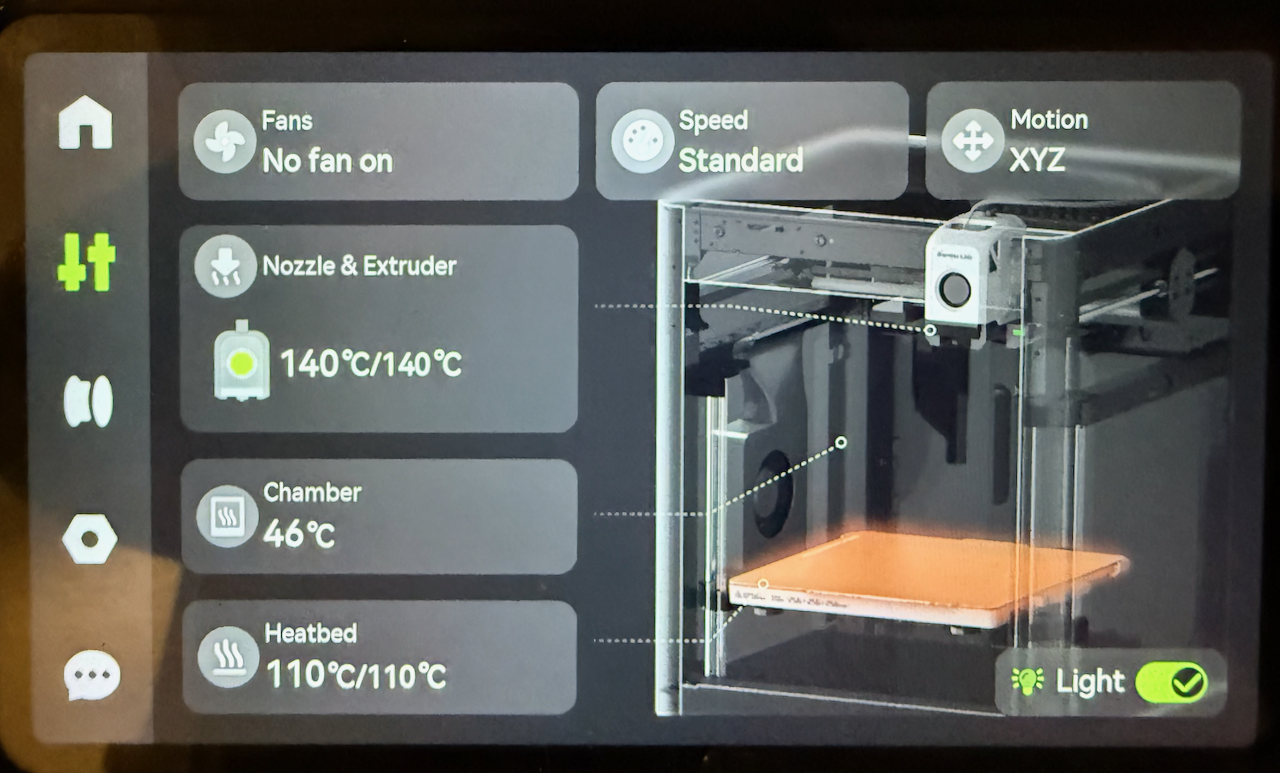
Controls
From the controls manual you will be presented with a pictorial of the status of all subsystems that can be controlled, these include
- Fans
- Nozzle and Extruder
- Heatbed
- Print Speed
- Motion
- Light
Pressing on any of these items excluding the Chamber (as on the X1C is not heated) and you will be presented with a screen where you can input your changes
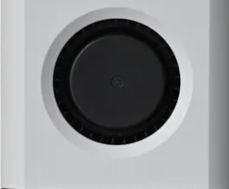
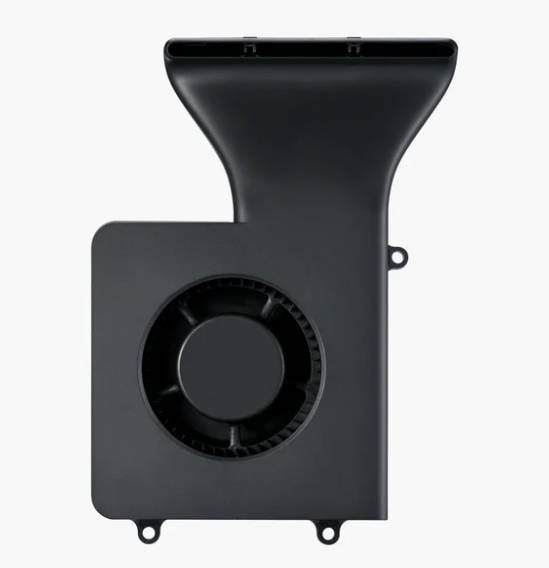
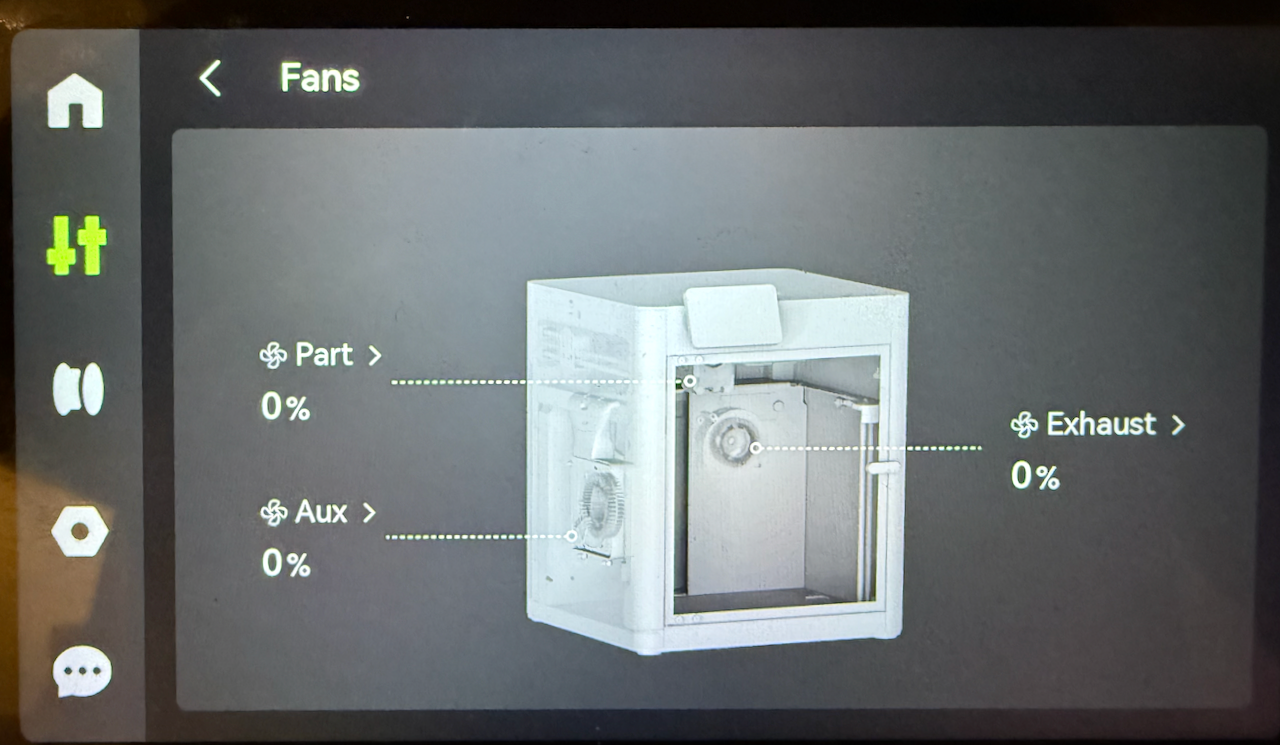
Fans
To enter the Fans Screen, press on the Fans button. This will then present you with what fans are turned on and at what percentage of speed. You can control the following fans
- Part Fan (on the toolhead)
- Auxiliary Fan (on the lefthand side) and
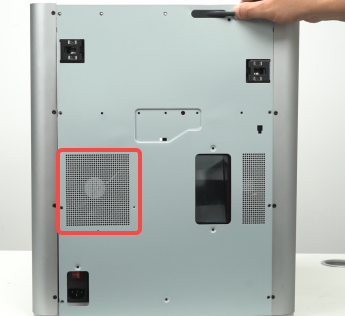
- Exhaust Fan (Back Panel)
| Part cooling fan | Auxiliary part cooling fan | Chamber temperature regulator fan |
 |
 |
 |
To open the settings for any of the Fans, press on the name of the fan, where you will then be presented with the controls.
Below is the Auxillary Part Cooling Fan controls. Currently the fan is switched off as the slider is grey and the fan speed is at 10%. If the requirement is to run the fan at 100% you can simply press the slider. Otherwise you can hit the + button to select the required speed

Below you can see the Auxillary Part Cooling Fan Settings, Currently the fan is switched on as the slider is green with a tick and the speed is set to 10%

Nozzle and Extruder
The Nozzle and Extruder controls allows you to set the
- Nozzle temperature
- Nozzle type and
- Extrude and retract the filament.
To move the filament in the extruder use the up and down arrows. The up arrow will retract the filament (move it away from the hotend, whilst the down arrow will extract (push it through the hotend)
Care is required when retracting the filament, as if you retract too far ( > 18mm) you risk clogging the extruder as you pull hot molten plastic into the extruder.

To set the extruder temperature click on the button under nozzle temperature. This will then bring up the screen where you can enter the desired temperature.

To set the Nozzle Type press the pencil icon next to the nozzle size and type currently installed

Heatbed
To set the heatbed temperature click on the heatbed button. You will then be prompted to input the temperature.

The maximum temperature that the heatbed can achieve is based on the mains voltage that the machine is using. 120VAC can achieve 120°C whilst 240VAC can achieve 110°C
Speed
This option will allow you to print the module with the motion settings increased, the speeds settings are below
- Ludicrous:166% of normal print speed and acceleration
- Sport:124% of normal print speed and acceleration
- Standard:normal print speed and acceleration
- Silent:50% of normal print speed and acceleration

This setting does not take into account max volumetric rate and does not confirm that the extrusion rates that are being used will be supported by the filament. It is recommended to instead tune your filament profiles to allow you to gain extra speed with confidence that the print will be a success.
Motion XYZ

XY Motion control.
The XY control allows moving the X and Y axis if required, as well as homing the axis. Below is a table that supplies what each of the 9 segments on the graphic do
|
|
1 - Move X towards the origin (10 Steps) |
| 2- Move X towards the origin (1 Step) | |
| 3 - Move X away from the origin (10 Steps) | |
| 4- Move X away from the origin (1 Step) | |
| 5 - Move Y away from the origin (10 Steps) | |
| 6- Move Y away from the origin (1 Steps) | |
| 7- Move Y towards the origin (10 Steps) | |
| 8- Move Y towards the origin (1 Step) | |
|
9- Home the printer so it knows where the origin exists |

Before manually homing or moving the XY axis ensure that nothing remains on the build plate that may foul the toolhead when homing
Z-Axis Motion control
The Z-Axes motion controls allow for moving the the headbed up and down in steps of 10 or 1

Filaments
The filament's allow you to assign, edit and control filaments that are loaded into your printer either via the AMS if fitted or an external spool as well as showing if a filament has been loaded into the extruder. If an AMS is fitted this is where you can
- Observe the filaments loaded including colour and filament type.
- Re-read a RFID Tag
- Unload a filament
- Load a filament
- If a filament is loaded which spool is loaded into the extruder
- If a non Bambu Labs filament has been loaded set all details of the filament
- If a Bambu Labs filament is loaded set the K factor (pressure advance)
- Spools that have a backup spool set for auto refill
- The humidity sensor of each AMS and
- The amount of filament left on the roll.

Editing Filaments
There are a few reasons that you mey need to edit a filament, including:
- Using an external spool
- Using a non Bambu Labs spool in the AMS
- Setting a spool to load a pre-saved K Factor on a spool set on the AMS
If a print job is currently in progress you will not be able to edit the filaments until such time as it has finished.
AMS
Non-Bambu Labs filament.

Bambu Labs filament.
If you have a bambu labs filamaent with a RFID tag, you will not be able to edit the filaments settings such as colour as this is all done through the QR Code. The only option that you will have is to set the Dynamic Pressure Control

External Spool
You do not have to have an external spool currently loaded into the extruder to be able to set the external spool settings, it can be done before or after loading the spool.
To edit the external spool details you need to select the external spool from the list of sources, If you have an AMS this will be to the right of you AMS units on the filament spools and can be identified by the label "Ext". To select it press on the external spool and you will be presented with a screen showing and empty spool.

Once the edit dialogue is shown select the:
- Filament Manufacturer
- Filamant Type
- Filament Colour and
- Dynamic Pressure Control profile if created
Once you are happy with the selection, press the confirm button.44
Below you can see that the Spool has now changed and shows that red PLA is now shown as the active filament is installed.

Loading and Unloading Filaments
AMS
You can manually load or filament from the AMS if you have the requirement to do so, however, normally this is not required as the correct filament will be loaded and unloaded by the printer.
Loading from AMS
You will only be able to load a filament into the extruder, if it is currently empty
To load an ams filament you need to select the slot that you wish to load and click on the spool picture, this will then highlight the spool by moving it above the others. Select the load button and it will start the process to load the filament into the extruder
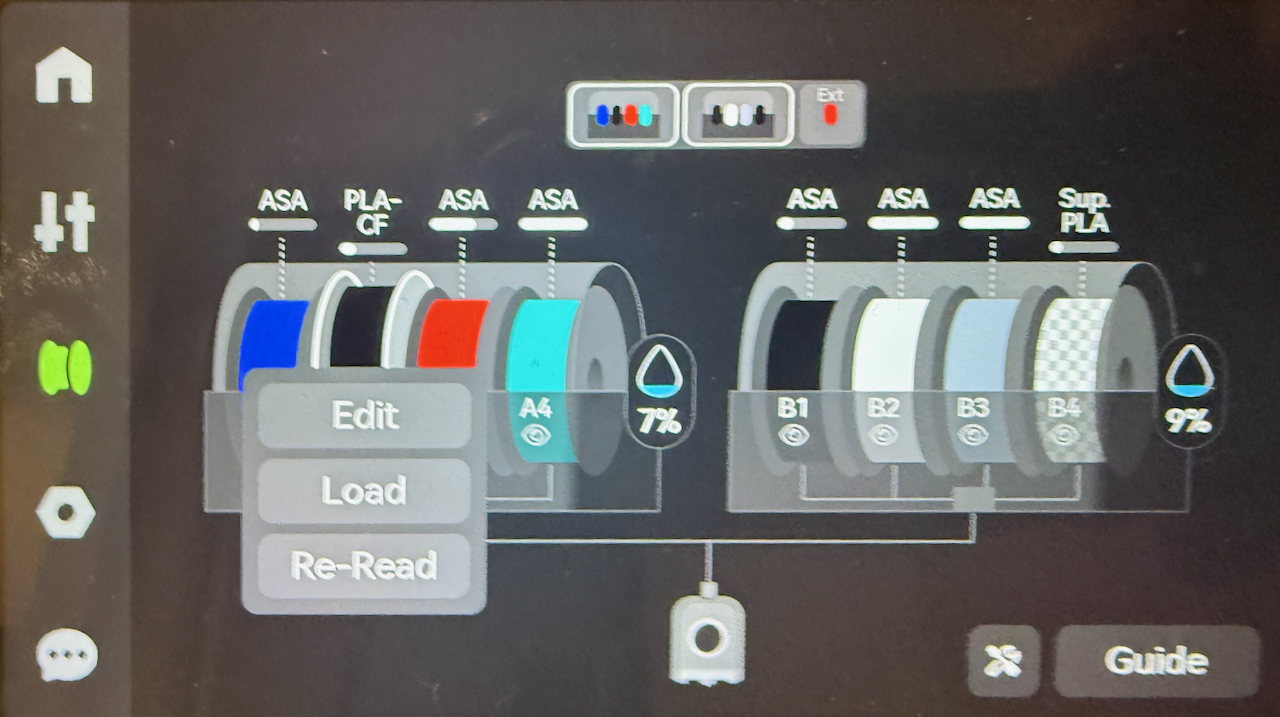
Once this has been completed the loaded filament will be shown by the path from spool to filament being shown. In the example below the Red ASA from B4 has been loaded and is ready for printing to commence.

Unloading from the AMS
You can manually load or filament from the AMS if you have the requirement to do so, however, normally this is not required as the correct filament will be loaded and unloaded by the printer.
To unload a filament that is stored on the AMS you will need to click on the filament to bring up the context menu and select unload,
Select the filament spool that you wish to unload, press on the spool and select unload from the context menu.
External Spool
There are many reasons why you may decide to use an external spool, including
- The filament that you are using may not support being loaded from the AMS, for example TPU 85A
- You are doing a quick print job with a filament and you do not want to load it into the AMS
- You are printing from an external dry box
- or an engineering filament that is required to be printed from a blast dryer to avoid moisture
Using a external spool requires additional manual steps that the AMS will perform for you
If you find that you have the requirement to commonly need to to print from an external filament source it is recommended to purchase the 4-in-1 PTFE adapter. I highly recommend it's purchase as it will save you from forgetting to re-install your AMS connection on the rear of the printer, hitting print on your next print and coming back hours later to a paused print job. All because you forgot to plug the AMS back into the printer..
Loading from an External Spool
The process to load an external spool requires the following steps
If not using the 4-in-1 PFTE adapter remove the AMS from the printer input PFTE tube
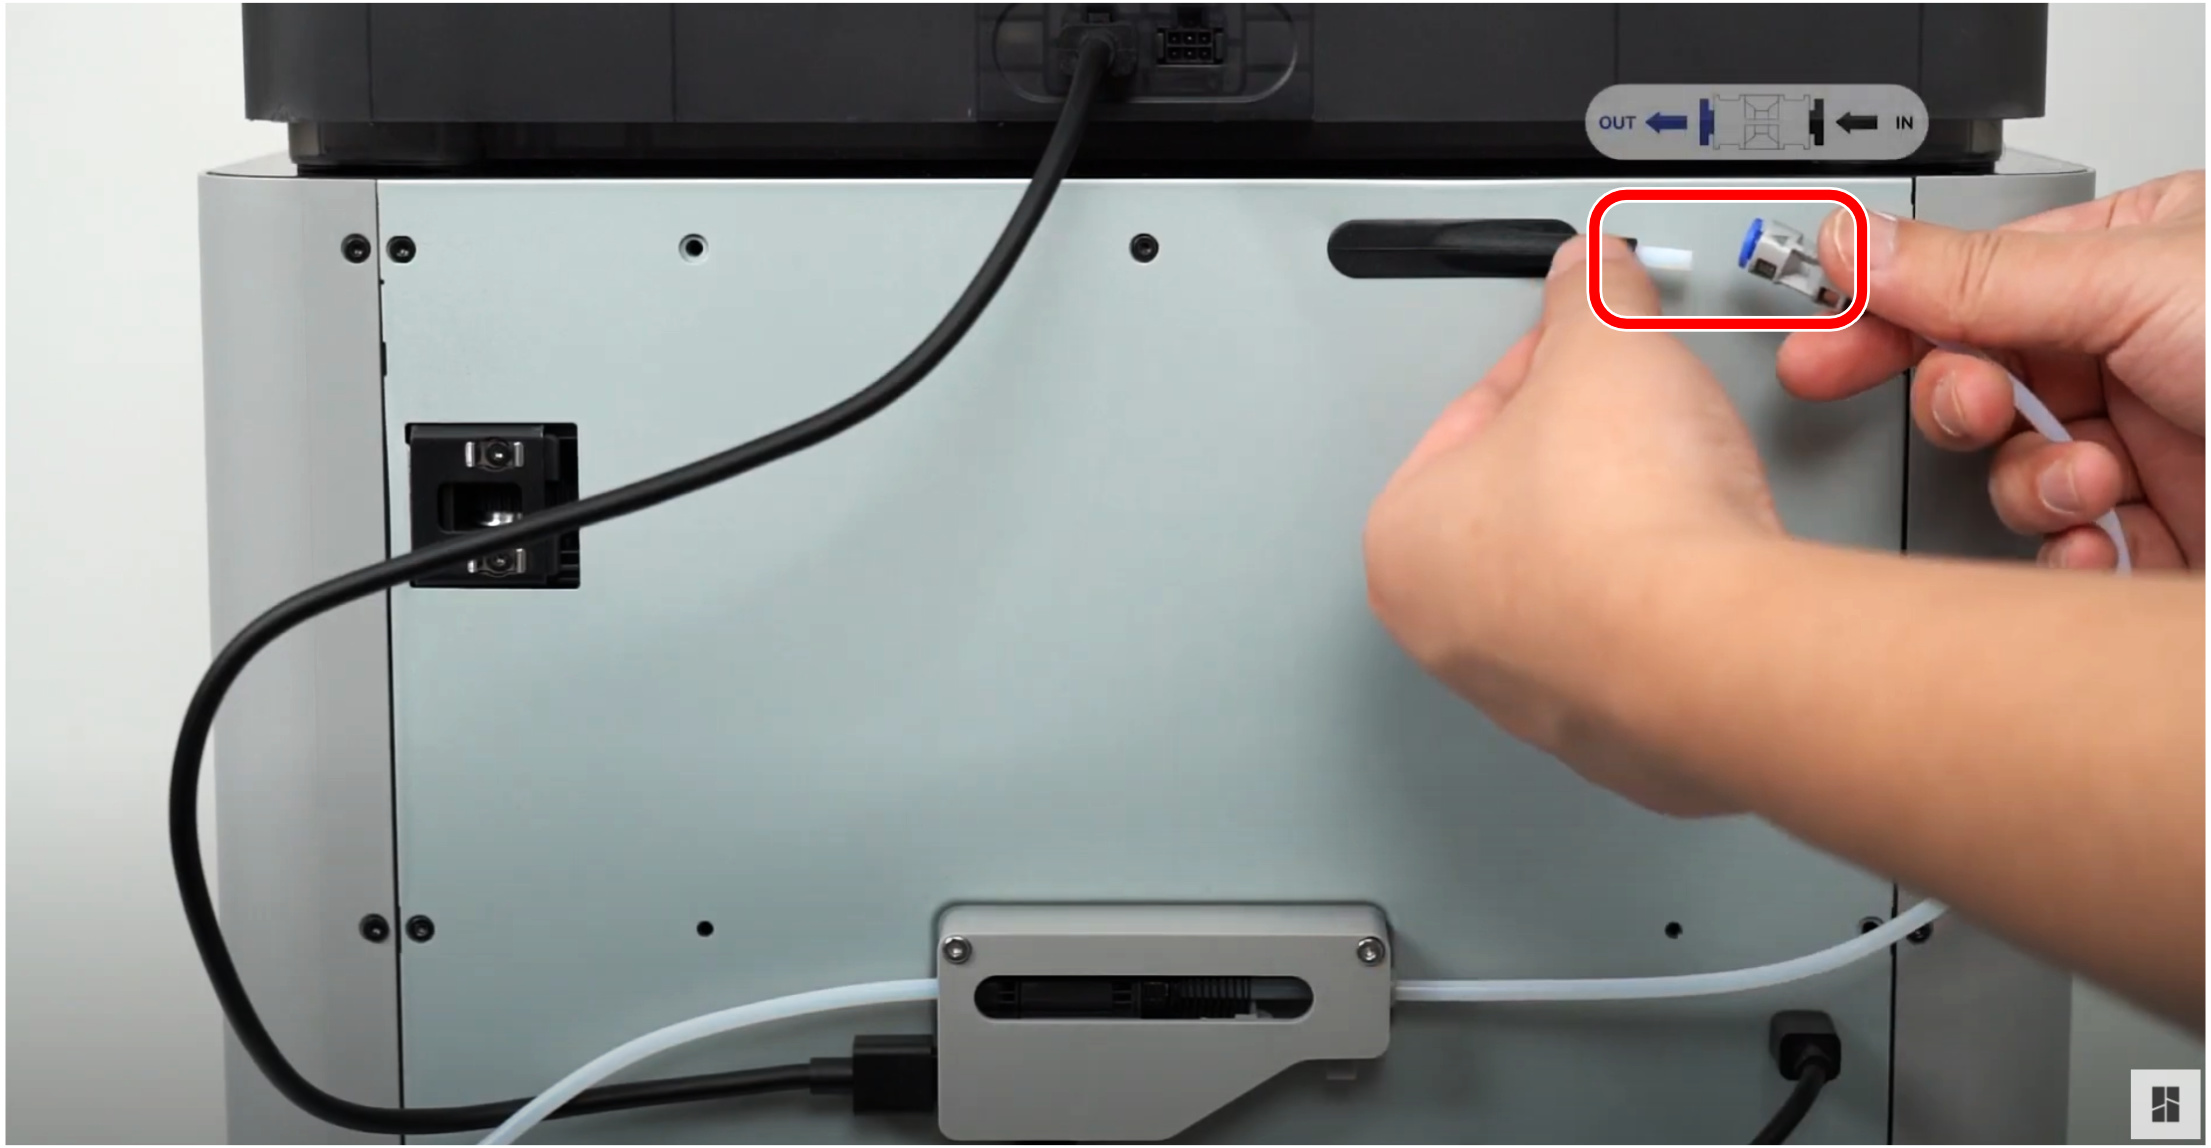
Select the external spool as the source of the filament
Press on the spool and then select the option to load the filament, even though the filament is not currently loaded it will still give you the option to unload it, ensure that you select load.

From here the printer will:
- Heat the extruder
- Perform a cut motion
- Move the toolhead to the poop chute and
- Prompt you to manually load the filament
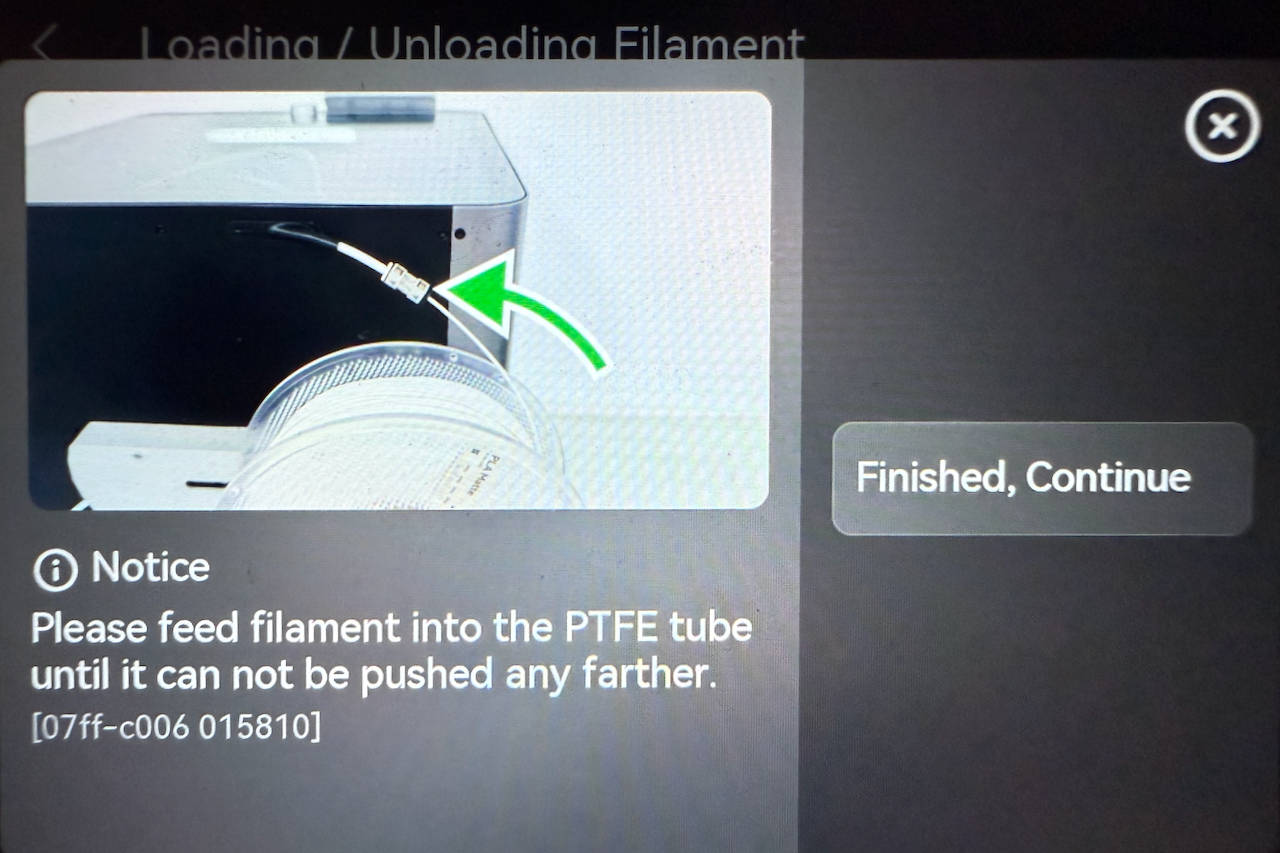
Carefully feed the filament into the input PFTE tube making sure that you do not push too hard and deform the filament. Once the filament has been pushed past the filament sensor you will be prompted to see if the filament has been extruded into the shoot. Keep pressing the "Not Extruded Yet; Retry" , whilst gently applying pressure to guide it into the extruder. Once the filament is moving on its own keep pressing the option until you see filament being extruded from the hot-end.
Once this has occurred, press "Filament Extruded; Continue"

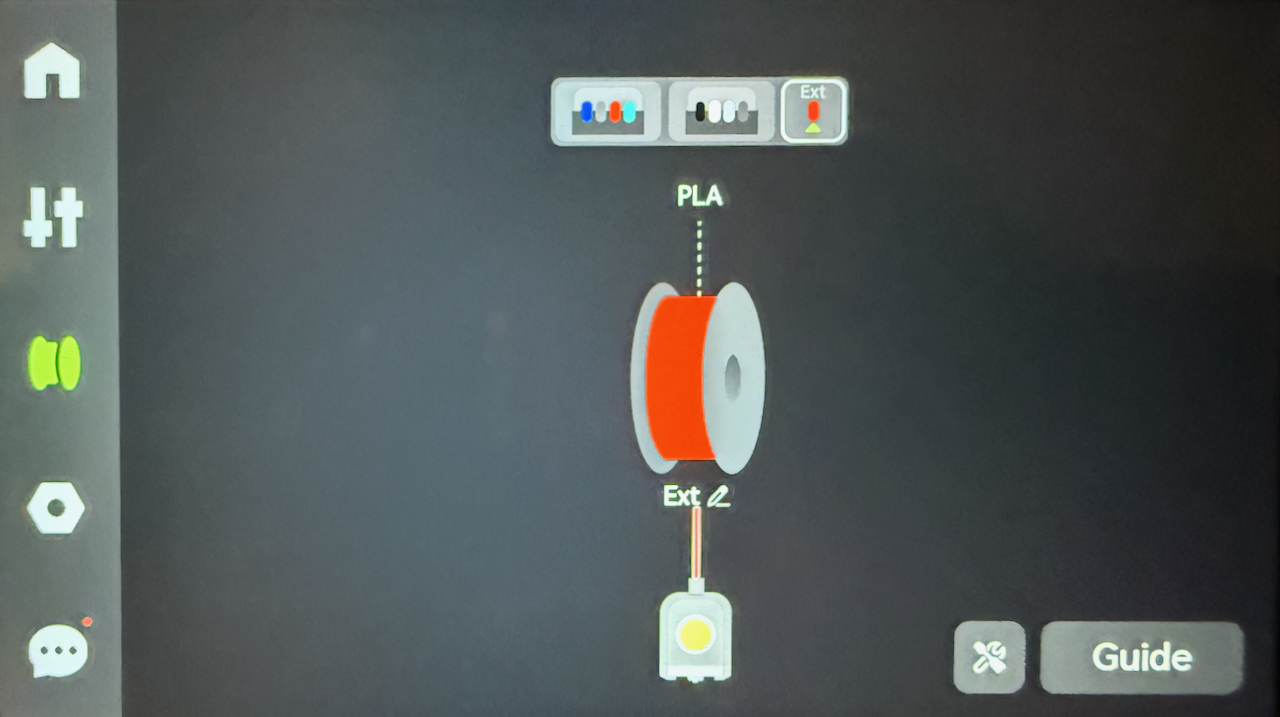
The printer will then purge out the old filament and prime the nozzle. Once this is completed the printer will then be ready to print from the external spool, and the screen will show the external spool connected to the toolhead.
Refilling the External Spool
If you are using an external spool and the spool runs out, you need to load a new spool. This is the same process as the load procedure.
Unloading the External Spool
Once you have unloaded the external spool, the printer will not reset the spool details unless you follow the spool reset steps
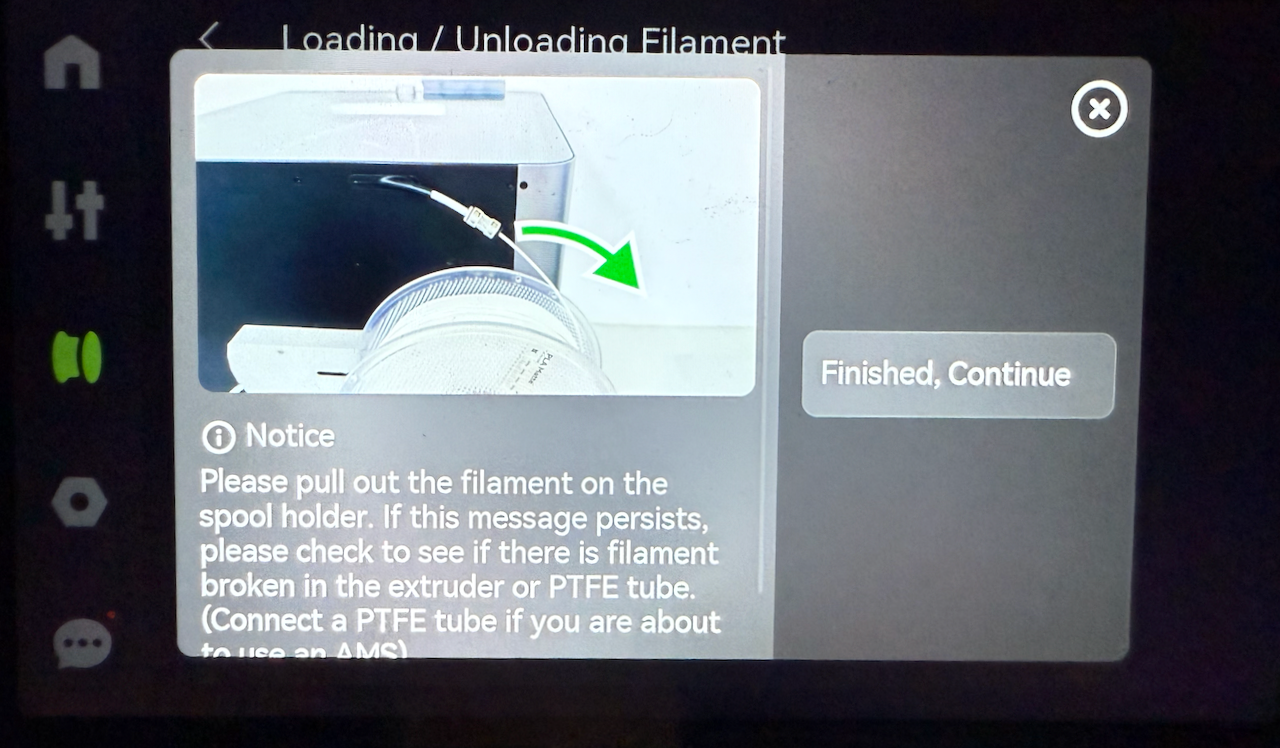
To unload the filament, select the external spool if not displayed, and confirm that it currently showing as loaded into the extruder
Press on the spool to bring up the filament, and bring up the context menu and select unload.
From here the printer will:
- Heat the extruder
- Perform a cut motion
- Move the toolhead to the poop chute and
- Prompt you to manually remove the filament
Once the the filament is removed the LCD will not still show the filament programmed unless the spool setting are reset
Once the filament out of the filament sensor the printer will update the display to show the extruder is unloaded
If you are using the 4-in-1 PFTE adapter make sure that you roll the filament back enough that the filament leaves the adapter. Otherwise it will foul the path that a filament from the AMS takes, as once it leaves the filament sensor the printer no longer can detect it
If you have removed the AMS from the back of the printer do not forget to reconnect it before performing your next print.
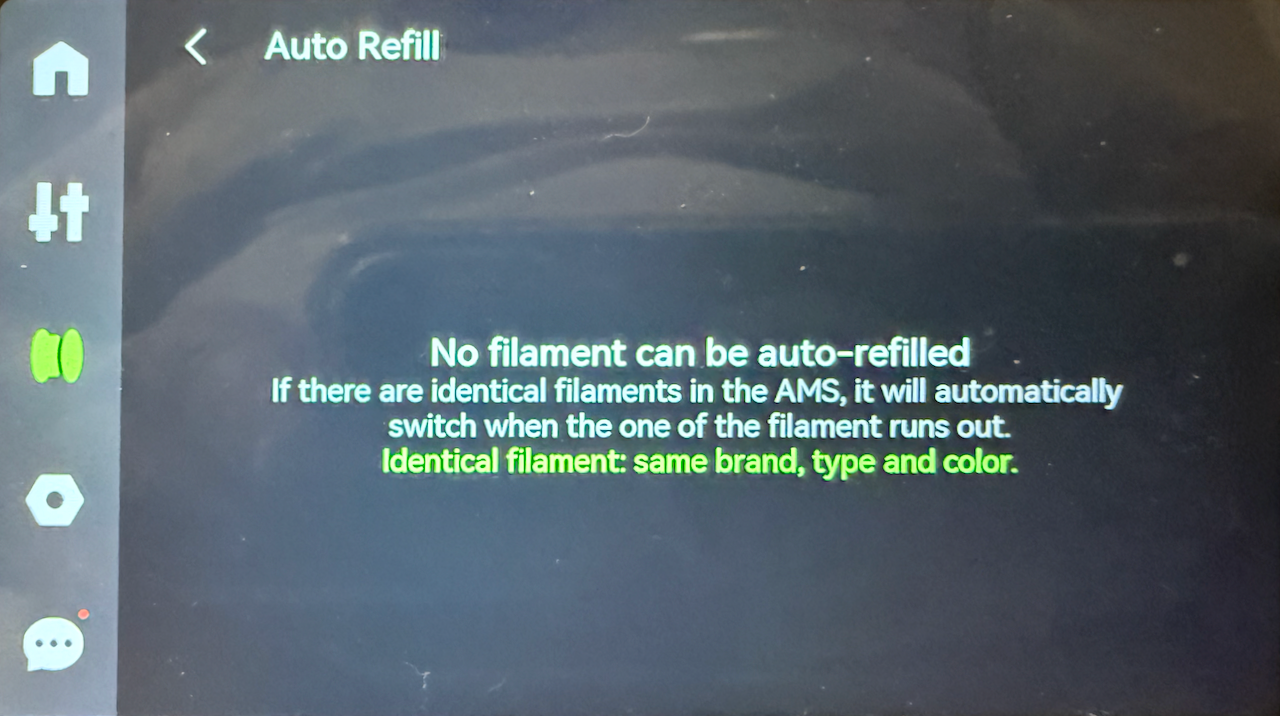
Auto Refill
One of the major benefits of using an AMS other than multi-colour printing, is Auto Refill. This allows that if an exact match of a filament (manufacturer, filament type, and colour) to be used if a matching filament spool becomes empty. To confirm that Auto Refill is enabled for a filament.
To bring up the auto refill screen click on the tools button at the bottom right and the select the Auto Refill button.

If a filament is matched the screen will show the spools (using slot numbers) to that will be used to refill each other.
When printing with Auto Refill enabled, ensure that you source your print from the spool with less filament available, the slicer and printer otherwise will print with the lowest slot number, even if this is the full spool.

if the printer does not have matching spools then the screen will show that the feature is enabled enable it
Settings
Some, but not all printer settings are able to be configured directly from the printer, but more advanced settings (like the above Auto Refill, can only be configured from either Bambu Studio or Bambu Handy. Others such as binding the printer to your Bambu Labs account you need to use an Applicaton and the Printer.

The setting that can be configured from the settings screen are:
- The Account the printer is bound to
- Printer Calibration
- Toolbox and
- Printer Settings
It also provides short cuts to frequently used setting:
- Wifi Settings
- SD Card Settings and
- Firmware
Account Settings
The account settings can be accessed by clicking on the Account button. Normally the account button will have the avatar of the currently logged in account.
The initial binding of the account is done during the printer setup.;
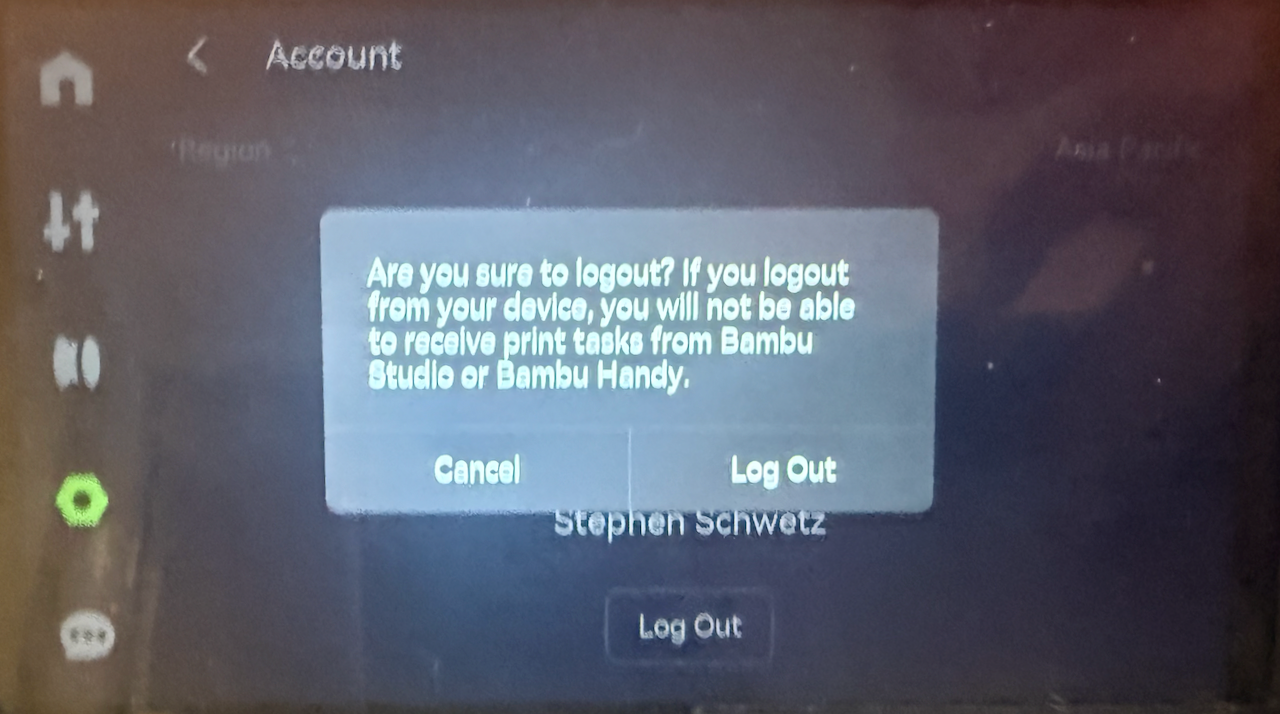
Logging out
If you want to rebind the printer to a different account you will need to log out of the current account bound to the printer. This will remove the printer from the bambu account and will need to be rebound to regain access. From here you will also be able to change the Region that your printer is in if you need to move region.
To log out of the bound account click on the log out button

The printer will then prompt you to confirm that you want to log out, Click "Log Out" to confirm
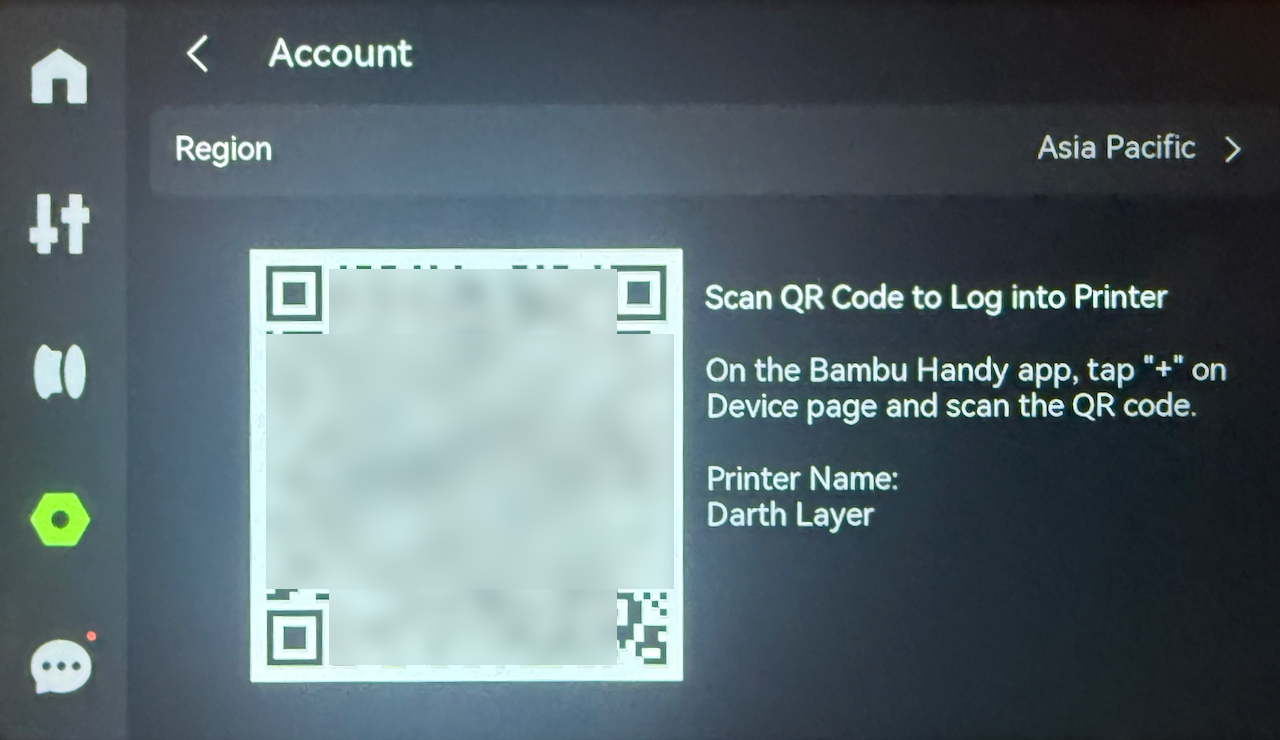
Binding Printer (Logging In)
If the printer is not bound to an account all online functions from the printer are not enabled until the printer is rebound. To bind the printer involves two steps on the printer screen:
- Select Region
- Scan QR Code with Bambu Handy
The first step is to select the correct region that your printer is installed in. Once you have selected the correct region, press confirm

The next screen that is presented will be the QR Code that is required to bind the printer to your Bambu Labs Account.
For information on the rebinding process is covered in Binding the Printer
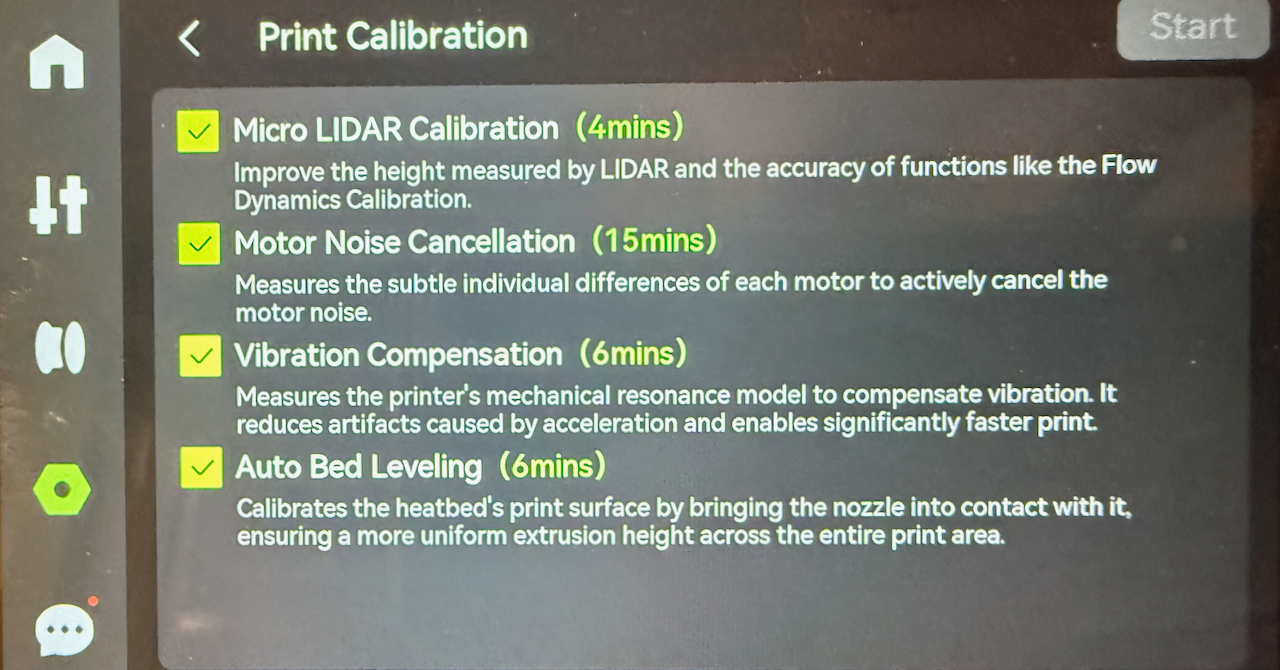
Print Calibration
Selecting this item allows you to run specific calibration routines which is required when you have replaced parts, performed printer maintenance, or if you notice print quality deteriorating.
You can chose to calibrate
- Bed leveling
- Moror noise calibration
- Micro Lidar calibration and
- Resonance frequency identification
Settings
From this screen you will be able to configure the printer and it's attached peripherals including
- Print Options
- AMS Options
- Video Resolution for the chamber camera
- LCD Sleep timout
- Printer Interface Languate
- If the Auxilary Part Cooling Fan is installed
- Device Serial numbers and other system identifiers
- Lan Only mode
- Export a support bundle to the SD-Card and
- Perform a factory reset
I am not going to do a deep dive into the settings in this chapter, that wiill be in a later chapter

Print options
This option allows you to control the subsystems that are used by the printer whilst it is processing a print job, Including
- AI Print options
- Build Plate Detection
- First Layer Inspection
- Auto Recovery from Step Loss
- Open Door Detection
- Store sent files on External storage
AMS Settings
Functions of the AMS system can be controlled through this interface:
- Read filament on insertion
- Read filament on startup
- Remaining filament estimation
- AMS Auto-Refill
- Arrange AMS Order
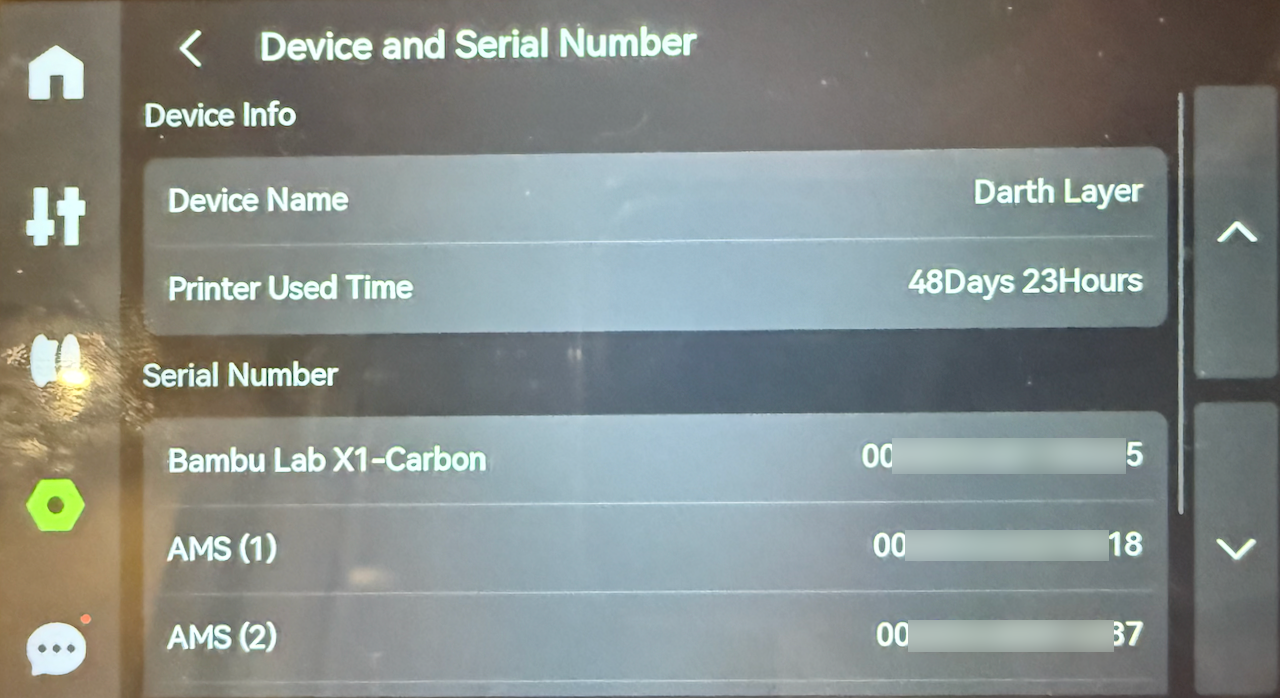
Device and Serial Number
This screen allows you to:
- Show and edit the device name
- How long the printer has been used for (cumulative)
- Serial number of the printer
- Serial number of attached items (ams)
- Join the User Experience Improvement Program
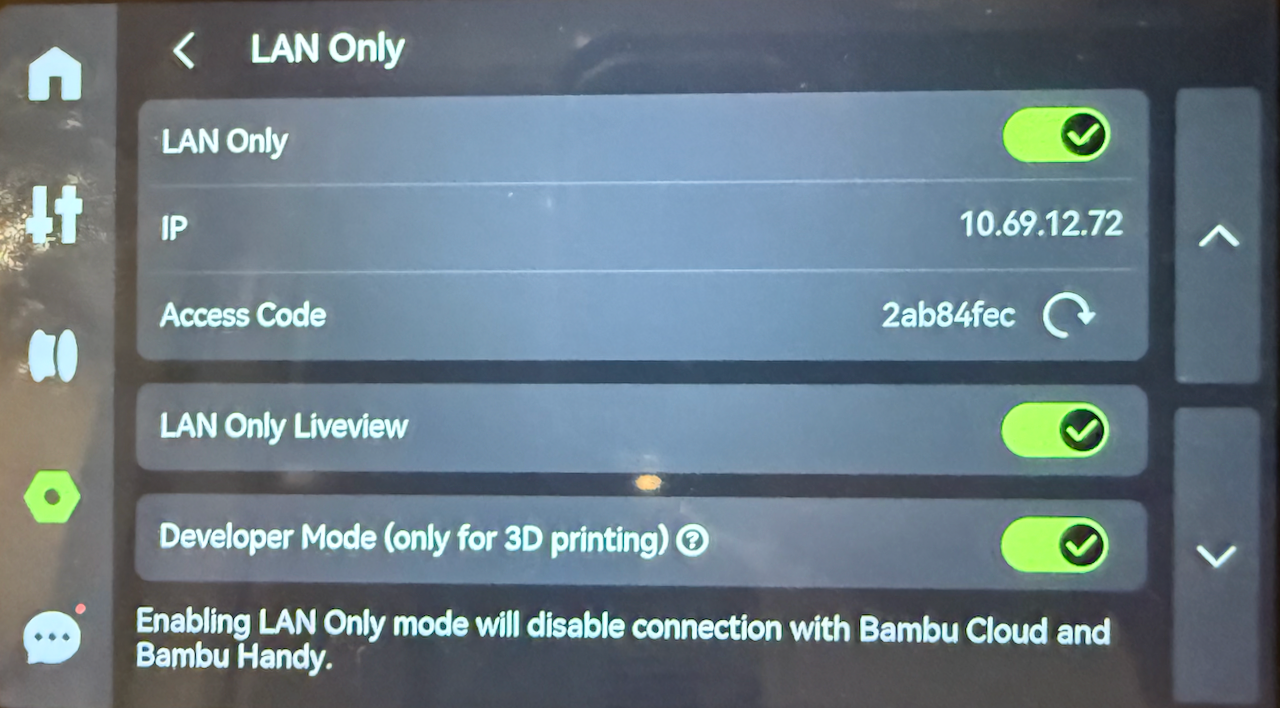
Lan Only Mode
This is an advanced setting and should only be turned on if you understand the caviates of using it
LAN only mode is used for two reasons:
- You do not want the printer communicating with the Bambu Cloud
- You want to use a non bambu product with developer mode to disable authorization controls on the printer
Enabling this will stop the printer communicating with the cloud, so you will be unable to use Bambu Handy from the internet.
To turn LAN Only mode on
- switch the switch on lan only to on
- the printer will generate the access code
- the printer will show the IP Address

You will then be given an option to use developer mode, which allows non-authorised commands to be sent to the printer from a program like Orca Slicer.
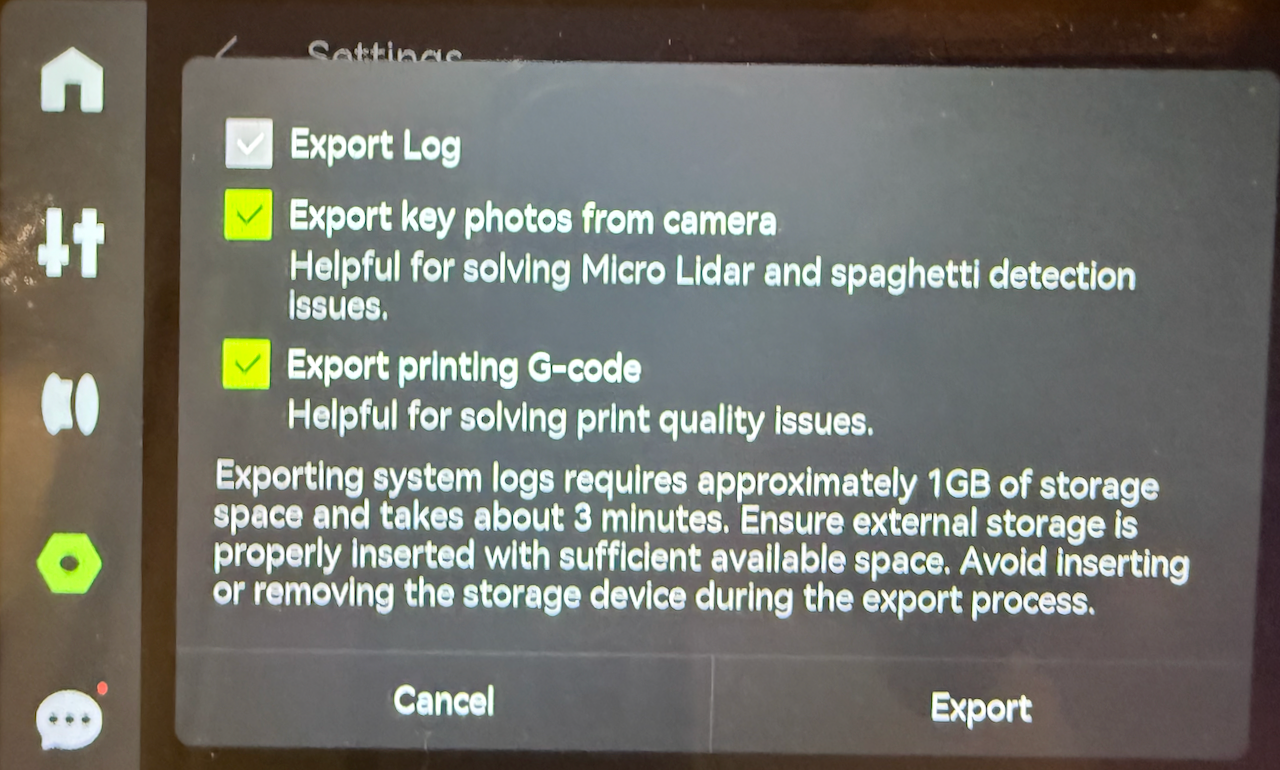
Export Logs
Whilst logging a support request for an issue that you are having with your printer, it is recommended to export the support logs and attach them to the job. When exporting files if you are having a printing issues, it is recommended to select all three items. The printer will bundle the files and then encrypt them so that only authorised people will be able to gain access to the logs.
Files
- Bambu Studio (Internal)
- Copied to the SD Card and
- Cloud Cache
Internal Files
Internal files are files that are stored in the firmware of the printer. These are files supplied by Bambu Labs to test the accuracy of the printer, tools used in 3d printing and for maintaining the printer.

SD Card
There are three ways to get files onto the SD Card, you could either
- Manually copy the file to the SD Card on your computer
- Enable Cloud File Cache, and this will print all files delivered to the Bambu Cloud Printing Service (Not LAN Mode)
- If LAN mode is enabled all files are copied to the SD Card

Printing from the files menu.
To print a file from either the Internal or SD Card select the item from the screen by pressing on the icon and then you will be presented with an option to print a plate from the file before selecting next choose if you want to enable:
- TimeLapse
- Bed Leveling
- Flow Calibration
Unlike with Bambu Studio or Bambu Handy, you can not change the Plate or Nozzle that need to be used, as the file has already been presliced to use the ones preset.

Follow the prompts to select the filaments that you wish to use for the print, Once again you cannot use a different filament type, if the file was sliced for PETG you cannot use PLA to print it. Once you press Next, the file will be sent to be printed

Toolbox
- Device Self-test
- Dry Filament
- Carbon Rods Clearance
- Lead Screws Lubrication

Tools
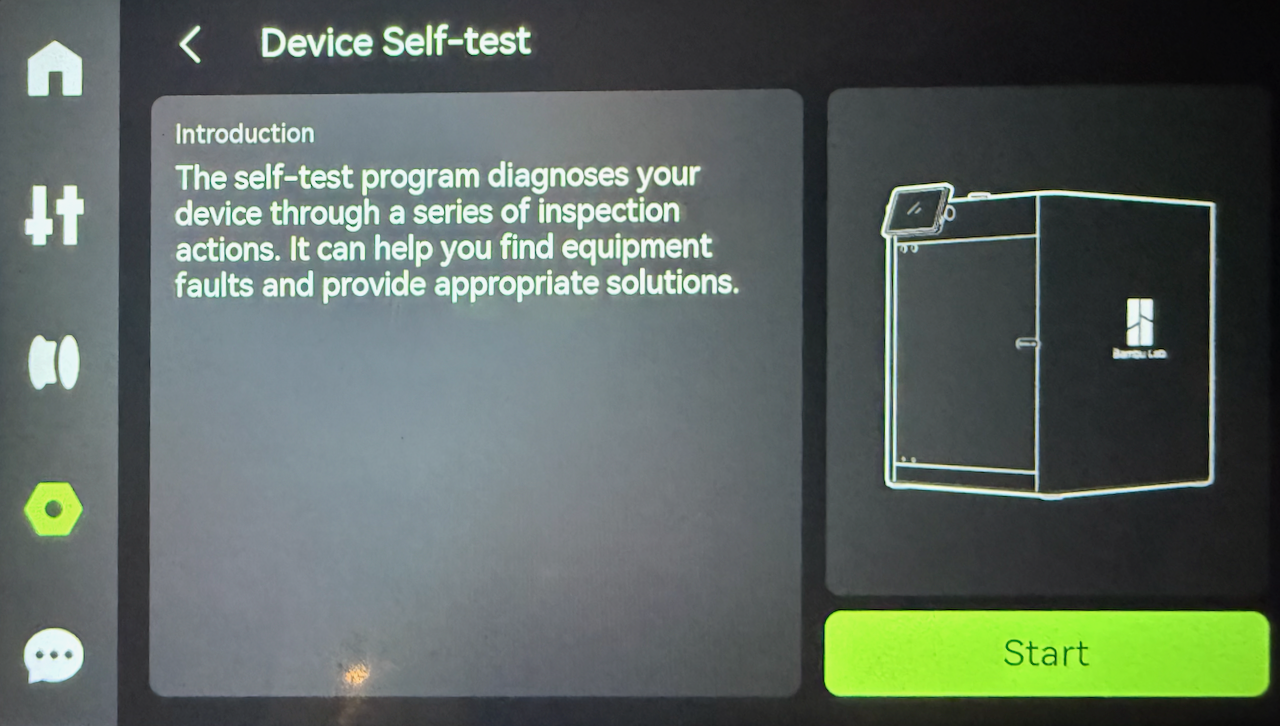
Device Self-test
If you are having issues with your printer systems, you can use the device self-test to have the printer ensure that all subsystems are functioning correctly. The Self-test tests the
- Hotend
- Heatbed
- Auto bed leveling
- Vibration compensation
To run a self test click on the self-test and then click on the start button, once this test completes you will be presented with the results.
Dry Filament
As the X1C has a heated bed, this can be used to dry filaments if they are too wet to successfully print.

Maintenance
The printer tracks the period between cleans for both carbon rods and the lead screw calibration
As the printer uses the cloud to provide, you should not rely on this feature if using LAN only mode the printer will not be able to calculate the days remaining correctly.
Carbon Rods Clearance
The printer tracks how long it has been since you cleaned the carbon rods. Every time you get a notice to clean the rods, once complete click complete on the screen. to reset the counter.

Lead Screw Lubrication
The printer also tracks the last time that the lead screws have has their grease renewed, ensure once you have lubricated the screws that you reset the counter by clicking complete on this option to reset the counter.

Wireless
The wireless settings are controlled from the WIFI option in settings. From here you can
- Turn Wifi Off/On
- Connect to wireless networks
- Test the network connection.

Test Network
The test network option allows you to perform a basic check to confirm that the printer can connect to the wireless and to the internet. The test will run showing when each test has been finished and when everything has been tested it will show the results

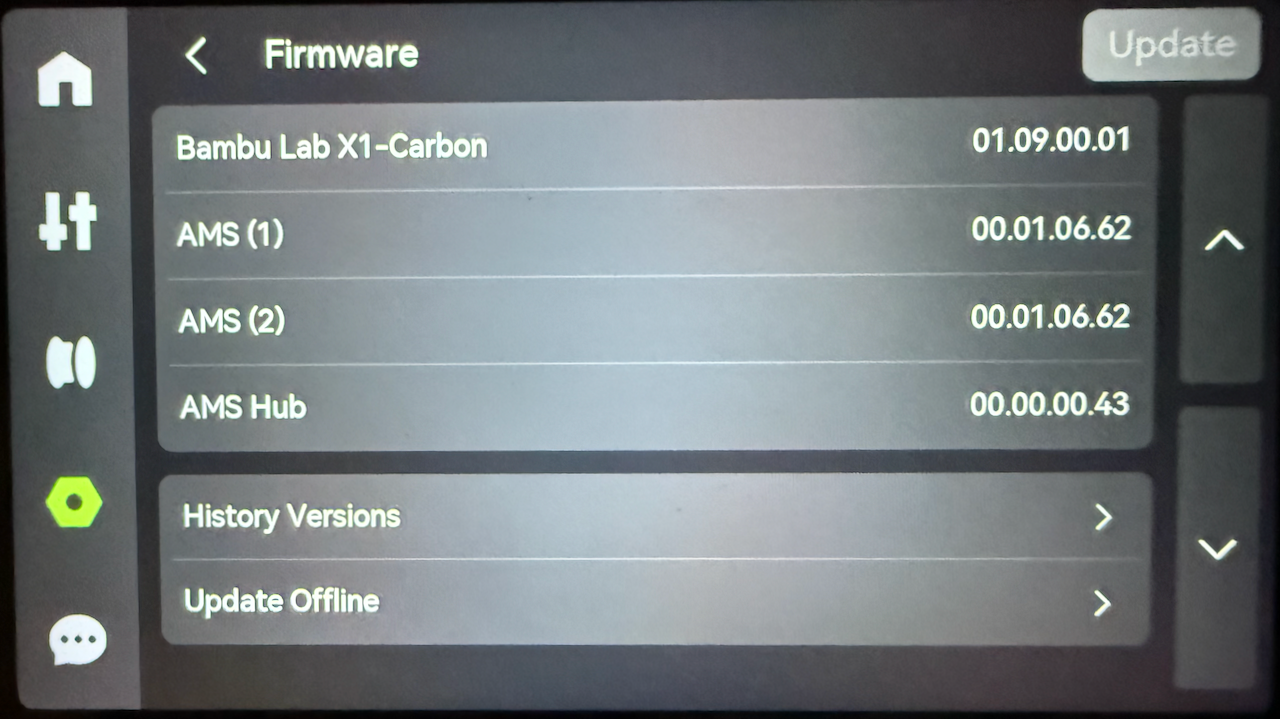
Firmware
The firmware screen shows the firmware that is installed for each of the device attached to the printer. If there are available firmware updates you can apply them via the Update button.
If the update button is green than a update is waiting to be installed.
No Comments